1. IMAGE QUALITY
We reproduce equal to the quality of file you send.
So use the best quality imagery you can for the best quality translation possible.
As artists, we use our expertise to translate your artwork
with the technology available - however do realize that the color consistency from one printing to the next can vary. We are “printing” with inorganic pigments not ink.
So embrace the permanency, the great detail and
realize there could be a shift of color in out of gamut hues.

2. ABOUT COLOR TRANSLATION.
January of 2022 we purchased a NEW PRINTER! The color spectrum is much greater. Since there are not so many out of gamut colors, the color matching is better.
Great blues, oranges, yellow, reds and blacks.

3. USING OTHER COLORED GLASS TO FUSE YOUR DECAL TO
By fusing decals to a blue colored or green colored glass, for instance- your colors in the decal will be affected. The low density or neutral hues will be influenced by the "background" color of glass.

4. Are you trying to match a LOGO with this process?
Know that this process offers excellent resolution, great detail and super permanency BUT to exactly match a color, especially someone's Logo....can be difficult. Best to convey to your client that printing with Glaze Frit is a cool means to get their branding on glass or ceramic- a place until now impossible to do with so much clarity, detail and permanence- but that an exact color match may not happen.

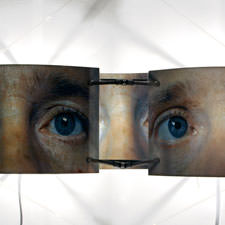
5. About Flux covercoat/ use image of Decal covered with Flux covercat.
Here is an example of Decals that have now been COVERCOATED. The image on the left is a Decal laminated with FLUX covercoat, it will have a YELLOW tint to it. These are dyes added into the paper at production to aid in spotting defects- do not worry these tints will completely burn away and will not affect your images or their color.
For CERAMICS typically we use FLUX covercoat .The downfall with FLUX covercoat is that you can see the outline of the decal. You have to carefully trim up to the image. If you are making ceramic sculpture,(not be eaten off of) you would not have to use FLUX covercoat.
6. About NONFlux COvercoat
Here is a Decal laminated with NONFLUX covercoat, it will have a sort of APRICOT tint to it. These are dyes added into the paper at production to aid in spotting defects- do not worry these tints will completely burn away and will not affect your images or their color.
For GLASS typically we use NONFLUX covercoat. With the NONFlux covercoat, the edges burn out and nothing but the image remains. Lately, we have noticed that once in a while there is ghosted image of the decal even on the NONFLUX covercoal. Be sure to use distilled water when soaking and just to be safe cut close to the image on the nonflux OR set up the image on the sheet so that there is decal all the way to the edge.

7. Are you finding that your edges of your decal are fraying or "peeling up a bit."
A Common problem- particularly on glass. This happens when you touch the very edge of your glass. The contact of your finger to that edge can cause it to slightly come away from the substrate and as it fires the decal can pullaway even more. This results in a ragged edge.
To mitigate this- NEVER TOUCH THE EDGE. Do not pick up the decaled glass on its edge. Rather push it off the table with a stick or ruler. Load into kiln by holding underneath.
8. about CERAMIC as Decal Surface
Ceramic glazes fired from Cone 06-10 work well. Our decal firing range of 1575-1650 F for ceramics provides flexibility for firing hotter on stoneware and porcelain glazes to develop a glassy surface on harder glazes. Testing our decals on your glaze at a variety of temperatures is recommended.

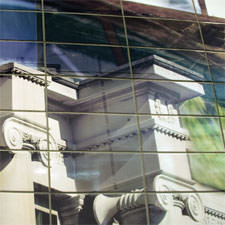
10. GLASS as decal surface
A. Kiln Forming. We will need an image of kiln forming. Just place hold for now
We specialize in high temperature glass decals that become fully fused when the glass begins to move in the kiln 1280-1475 F depending on the glass and the kiln-forming process. All fuse compatible art glass COE 90 and COE 95 works well. We recommend Spectrum System 96, it is smooth and easy to transfer decals to the surface. For glass that are not smooth we recommend
pre-firing/full-fusing to flatten the glass prior to transfer to reduce water bubbles and defects. Your imagery can be fired on the surface or stacked in-between layers and full-fused. Full-fusing with imagery between layers requires two firings, one fuse the decal and a second to stack and full-fuse.
B. Hot Glass. Need an example as well
Fused to sheet glass, decal transfers can be rolled-up and blown.Cylinder blanks can be blown and annealed. Decals are then transferred around the cylinder and pre-fired to 1120 F. Blanks can then be picked up and blown. Imagery becomes fully fused in the glory hole.With both roll-ups and blanks using white glass helps hold color due to opacity. Imagery can be gathered over with clear with no loss of color from the extreme temperature of the furnace glass. Torching and all other hot glass technique are the same.
C. Boro-silicate glass. Need an example as well
For decal transfer after the work is completed we recommend firing up to 1350 F to achieve the best fusing of the imagery. The challenge is to make forms that have a shape and thickness to avoid slumping during the decal firing. Firing normally up to the annealing temp and then fast/flash firing up to 1350 F fuses the decal and helps hold the form.
D. Float Glass.